Showing posts with label Sweets. Show all posts

Monday, April 16, 2012

Lemon Pie Meringue


Bbrp kali lewat di depan cafe di seputaran Melbourne, kita (baca : aku dan anak2) suka ngeliatin pie ini. Aku sampe mikir gimana cara bikinnya.
Akhirnya ketemu resepnya di taste.com.au bersama videonya.
Sebenarnya agak ribet. Tapi si Sulung-ku berkeras mau bikin karena dia memang suka sekali lemon dan meringue. Akhirnya kita berdua sama2 baca resep , nonton video tutorialnya.
Dan asyiklah kami bertiga di dapur.
Rasa sangat pas, cuman meringue nya agak kurang kering, karena aku udah buru2 pengen ngeluarin dari oven, alasannya cuman satu mau moto sebelum matahari redup. Ya begitulah kalo bikin makanan udah menjelang sore udah dag dig dug aja nggak keburu motonya..

Lemon Meringue Pie


Ingredients

  • 225g plain flour
  • 55g almond meal
  • 60g icing sugar mixture
  • 125g chilled butter, chopped
  • 1 egg yolk
Lemon Filling

  • 5 eggs lightly whisked
  • 300ml thin cream
  • 155g caster sugar
  • 1 tbs grated lemon rind
  • 125 ml fresh lemon juice
Meringue

  • 3 egg whites
  • 125g caster sugar
Method

  • To make lemon filling, whisk together the eggs, cream, sugar, lemon rind and lemon juice until combine. Cover with plastic wrap and store in fridge for 1 hour to develop the flavors 
  • Meanwhile place plain flour, almond meal, icing sugar in the bowl of food processor and process until it resemble fine breadcrumbs. Add the yolk and process until dough until just starts to come together.
  • Turn the dough to lightly floured surface and knead until smooth. Shape into a disc, cover with plastic wrap and place to fridge for 30 minutes to rest
  • Preheat oven to 200 C. Roll put the pastry in lightly floured surface to 3mm thick disc. Line a round 5 cm deep 18 cm (base measurement) fluted tart tin, with removable base with pastry and trim any excess. Place to the fridge for 30 minutes to rest.
  • Cover the pastry base with baking paper and fill with pastry weights, rice or dried beans. Bake in oven for 10 minutes. Remove the paper and pastry weights, rices or dried beans. Bake for 8 minutes or until golden. Remove from oven and reduce oven temperature to 160 C
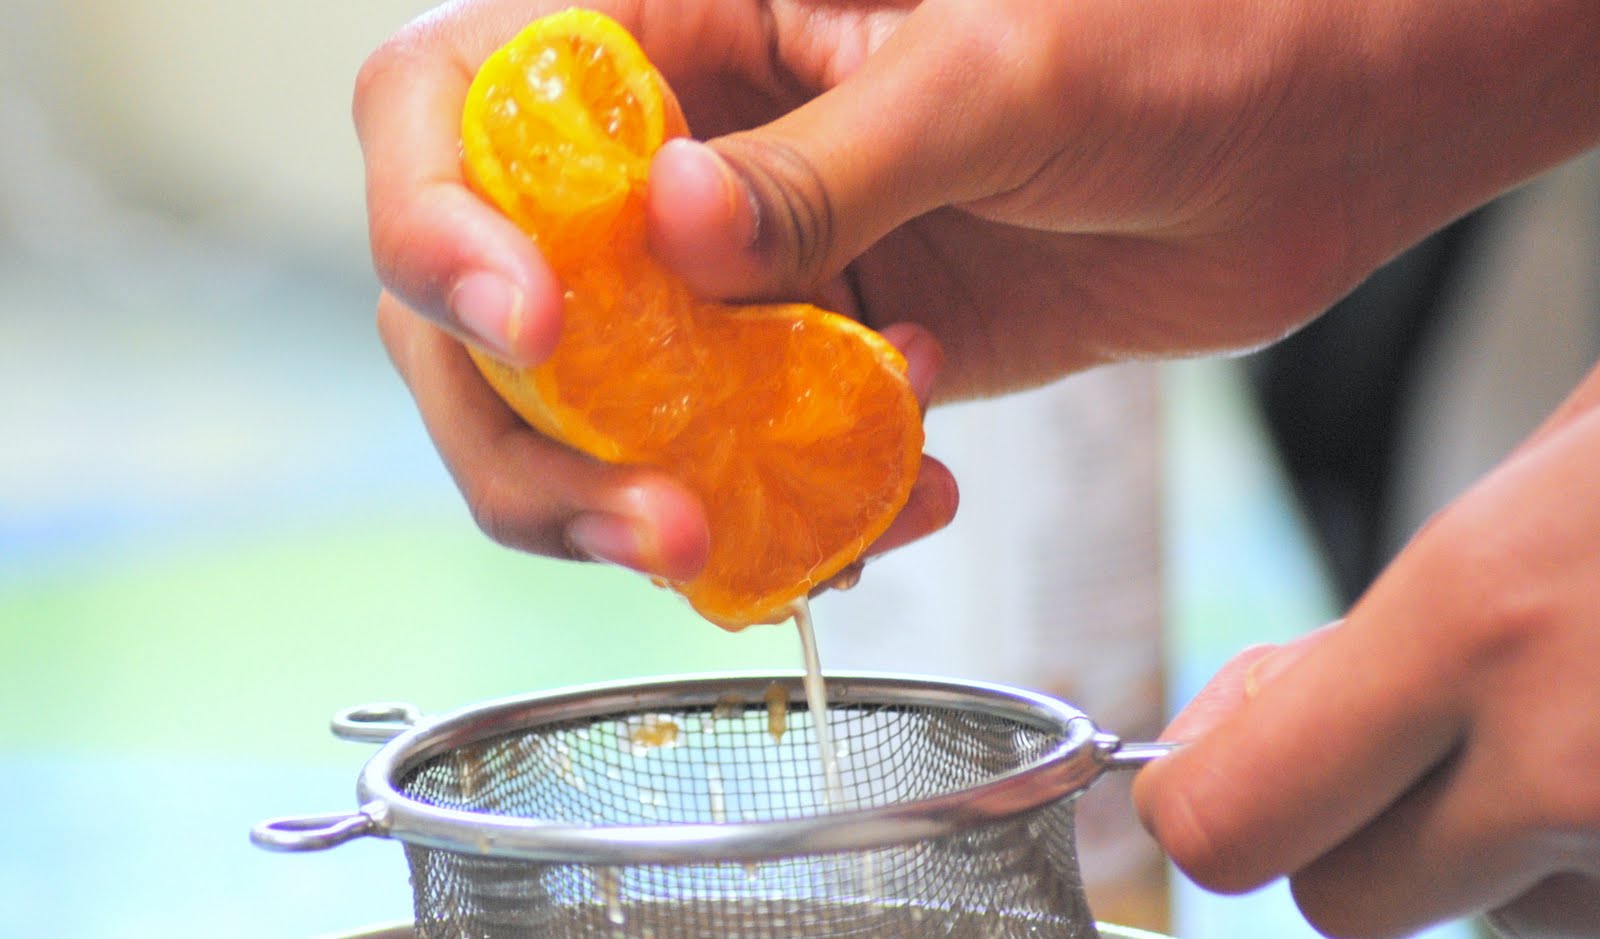
  • Strain the lemon mixture through a fine sieve into a jug. Pour into the pastry case. Bake in oven for 30 minutes or until just set. Remove from oven, and set aside  for minute to cool. Place in fridge for 1 hour to chill. Increase oven temperature to 180 C
  •  To make the meringue, use a electric beater to whisk the egg white in clean dry bowl until soft peak form. Gradually add sugar one table spoon once at the time, whisking constantly until thick and glossy. Spoon the meringue mixture over the tart and spread to the edge of pastry. Use  the back of the spoon to lightly touch the meringue to create peaks, bake to the oven for 8 to 10 minutes or until golden. Set aside to 15 minute to cool. Cut into wedges to serve.

Monday, February 13, 2012

Rich Chocolate Tart


Begitu banyak list masakan yg udah nangkring di catatan. Kesibukan domestik minggu ini ada lebih ekstra krn anak2 sudah mulai kembali sekolah. Akhirnya setelah melewati minggu yg melelahkan, bisa terobati dengan kembali ke dapur untuk baking dan moto2 ..teteup..:)

List pertama yg harus dikerjakan adalah Rich Chocolate Tart, karena udah lama ngeces ngeliat temen2 di IDFB bikin ini. Setelah googling akhirnya mutusin pake resepnya Australian Women Weekly yg aku ambil dari blognya mbak Hesti. Thanks mbak Hesti, udah banyak memberi inspirasi.
Karena mbak Hesti bilang di blognya kalau pienya terlalu buttery, maka saya kurangi butternya. Dan saya hanya pake kuning telur 2 karena persedian telur di rumah tinggal segitu..:) tp saya tambahin sedikit krim kentalnya

Waktu menuang Chocolate Filling, masing ada sisa bbrp ml, akhirnya sisanya itu saya tim dan saya jadikan ganache setelah tartnya dingin.


Rich Chocolate Tart

source : The Australian Women Weekly (Best Food : Dessert)
via : Hesti

Pastry
  • 185 gr terigu
  • 25 gr coklat bubuk
  • 55 gr icing sugar mixture
  • 150 gr mentega dingin (saya pake 110 gr butter dingin)
  • 2 kuning telur
  • 1 sdt air dingin
Campur tepung, gula icing, bubuk coklat dalam mangkuk food processor kemudian proses hingga tercampur rata. Masukan kuning telur dan air, proses lagi hingga tercampur rata. Keluarkan dari food processor, uleni dengan tangan hingga bener rata, padatkan, bungkus dengan plastik wrap simpan dalam lemari es selama 3o menit

Keluarkan pastry dari lemari es, giling hingga cukup lebar sehingga bisa memuat loyang pastry bongkar pasang ukuran 24 cm. Taruh pastry kedalam loyang, tekan2 sisinya sehinga padat memenuhi seluruh bagian loyang, rapikan bagian ujung2nya
Tutup lagi dengan plastik wrap dan simpan kembali ke lemari es, selama 30 menit

Panas kan oven dengan suhu moderat (saya menggunakan suhu 180 C)

Keluarkan Pastry dan alas permukaannya dengan baking paper dan taruh kacang2 kering atau beras sebagai pemberat. Bakar 15 menit. Kemudian lepaskan baking paper dan bakar kembali selama 10 menit (saya kemarin bakar sampe 15 menit lagi krn pastrynya belum begitu kering)

Chocolate Filling
  • 4 kuning telur (saya cuman pakai 2 kuning telur)
  • 2 telur
  • 55 gr caster sugar
  • 80 ml krim kental (saya pake 120 ml)
  • 300 gr Dark Cooking Chocolate (lelehkan)
  • 1 sdt ekstrak vanilla
Kocok telur dan caster sugar hingga kental dan creamy. Masukan DCC yg sudah dilelehkan, krim kental dan vanilla ekstrak, aduk rata. Tuang kedalam pastry yg sudah dipanggang, bakar kembali selama 30 menit (saya bakar dengan suhu 180 C)
Dinginkan , kemudian beri hiasan.
Krn saya masih ada sisa filling, lalu saya tim dan saya jadikan ganache.

Monday, January 09, 2012

Portuguese Tarts


Jamie Oliver..who doesn't know him ? he's laid back with a unique English accent, and he works in the kitchen very quickly.
I've seen him make these Portuguese tarts in a cooking show, along with two other recipes, in just 30 minutes. But, when I tried to make my self, it took me over an hour ........yeah well , I took a picture of everything, step by step ..:)


Portuguese Tarts
(source : Jamie's 30 Minute Meals book)
  • plain flour, for dusting
  • 1 X 375 gr pre-rolled puff pastry
  • ground cinnamon
  • 125 gr creme fraiche ( I used thickened cream)
  • 1 egg
  • 1 teaspon vanilla paste or vanilla extract
  • 5 tablespoons golden caster sugar ( I used raw sugar)
  • 1 orange
Dust clean surface with flour. Unroll the sheet pastry, the cut it in half so you end up with two 20 x 20 cm square of pastry (put one in the fridge for another day). Sprinkle over a few good pinches of ground cinnamon, roll the pastry into a swiss roll shape and cut into 6 rounds. Put these into 6 of the holes in a muffin tin and use your thumbs to stretch and mould the pastry into the holes (just like a picture) so the bottom is flat and the pastry come up to the top. Put on the top shelf of the oven and cook for around 8 to 10 minutes (set the timer) or until lightly golden.

Spoon the creme fraiche into a small bowl, add egg, vanila paste or extract, 1 tablespoon of golden caster sugar and the zest of 1 orange, mix well.

Take the muffin tin out of the oven, and use a teaspoon to press the puffed pastry back to the sides and make room for the filling. Spoon the creme fraiche mixture into tart cases, and return to top shelf of the oven. Set timer for 8 minutes.

Put a small saucepan on a high heat. Squeeze in the juice from the zested orange and add 4 teaspoons of golden caster sugar. Stir and keep a good eyes on it, but remember the caramel can burn badly so don't touch or taste.


Pour some caramel over each tart (they'll still be wobbly, but that's good). Put aside to set.

Wednesday, November 23, 2011

Creamy Mango Pavlova

Pavlova is meringue based dessert named after Russian ballet dancer Anna Pavlova . Its a meringue with crisp crust and soft. The dessert is believed to have been created in honour of the dancer either during or after one hers tours to Australia and New Zealand in the 1920s.
The nationality of its creator has been a source of argument between the two nation for many years, but formal research indicates New Zealand as the probable source.
The dessert is a popular dish an important part of the national cuisine of both countries, and with its simple recipe, is frequently served during celebratory and holiday meals (wikipedia).

And today I made a creamy mango pavlova.. its very delicate, crispy crust outside dan chewy inside..:)

Creamy Mango Pavlova

Ingredients
  • 4 egg whites
  • 1 cup caster sugar
  • 1 teaspoon white vinegar
  • 2 cups thickened cream
  • 2 manggo, sliced thinly
Method
  • Beat egg whites in mediun bowl with electric mixer until soft peaks form
  • Gradually add sugar, beat until sugar is dissolved
  • Fold through white vinegar
  • Cut a 25 cm circle of foil or parchment paper, place onto greased baking tray. Spread meringue evenly over parchment paper.
  • Bake at 120 c for 1 hour
  • Turn oven off, leave door closed allow pavlova to cool in the oven
  • Carefully peel awal the parchment paper, place pavlova onto serving dish.
  • Pure 1 mango
  • Whip cream until firm peaks form, fold in mango. Spread over pavlova
  • Decorate with remaining sliced mangoes.

Tuesday, November 01, 2011

Hazelnut Macarons


Akhirnya memberanikan diri juga untuk mencoba resep ini. Setelah ketemu resepnya dan dicoba dipahami berkali kali, baru berani masuk dapur dan nimbang bahan..
Bikin macarons memang rada-rada tricky, setelah bener mengerjakan langkah-langkahnya, tahap berikutnya adalah pemahaman akan oven kita. Untuk percobaan pertama ini satu loyang yg saya taruh paling duluan dan paling atas itu tidak menghasilkan macarons yg berkaki, kemungkinan krn saya suhu oven saya sebelah atas lebih panas dibanding rak kedua dan ketiga.
Alhamdulillah loyang di rak ke 2 dan ke 3 bagus , tidak lengket dan berkaki.
Saking happynya..udah berniat minggu depan mau bikin lagi dengan rasa lain. :D

Resep saya modifikasi dari tartelette.com


Bahan
  • 90 gr putih telur (dari 3 telur)
  • 110 almond bubuk
  • 30 gr gula kastor
  • 200 gr gula bubuk
  • 1 1/2 sdt kopi hazelnut instant
  • 1/2 sdt esen kopi mocca

bahan filling :
  • Nutella

Cara :
  1. Kocok putih telur hingga berbuih, masukkan sedikit demi sedikit gula kastor sambil terus diaduk hingga mencapai soft peak, masukkan segera esen kopi mocca aduk sebentar. Sisihkan
  2. Ayak gula bubuk dan almond bubuk kemudian tambahkan kopi bubuk instan
  3. Masukan adonan tadi kedalam adonan putih telur secara bertahap (saya membagi campuran almond + gula bubuk menjadi 4 bagian) setiap kali memasukkan campuran almond aduk dengan cara membalik adonan kurang lebih 10 kali adukan
  4. Setelah rata masukkan adoan kedalam piping bag yg ujungnya sudah dipasang spuit bulat
  5. Semprot adonan ke atas loyang yg sudah dialas baking paper, sehingga membembentuk lingkaran dengan diameter 3 cm
  6. Diamkan adonan selama kurang lebih 30 sd 1 jam sampai lapisan diatas adonan menjadi kering (jika disentuh ujung jadi tidak menjadi lengket)
  7. Panaskan oven dengan suhu 140 C (masing2 oven akan berbeda ..kenali oven anda :D)
  8. Bakar kurang lebih 20 sd 25 C
  9. Keluarkan dari oven, dinginkan dan angkat
  10. Lapisi macaron bagian bawah dengan nutella, tempelkan bagian lain.
  11. Siap dinikmati


Saturday, October 29, 2011

Hazelnut Tiramisu


Untuk cake yg satu ini 'enak' is not enough .. enaaak banget...
mari dicoba..

Bahan :

250 gr keju Marscarpone
400 ml whipped cream (suhu dingin)
125 gr gula kastor

1/2 sdt vanilla essence
4 kuning telur
50 gr gula kastor

24 buah biskuit lady finger

1 sachet hazelnut kopi instant
200 ml air hangat

Cara:
  1. Kocok keju marscarpone dengan mixer sebentar
  2. Keluarkan whipped krim dari kulkas, kocok bersama gula kastor hingga kaku, dan simpan kembali kedalam kulkas
  3. Kocok kuning telur + gula halus + vanilla essence dengan mikser hingga kental. Panaskan air didalam panci, kemudian taruh di atasnya mangkuk tahan panas tuang adonan kuning telur tadi sambil terus dikocok sampai telur hangat, angkat dinginkan.
  4. Aduk 1 sachet hazelnut kopi instan dg 200 ml air hangat. sisihkan
  5. Kocok whipped cream dan marscarpone dengan sambil dituang adonan kuning telur, setelah rata matikan mikser
  6. Siapkan piring saji persegi ukuran 22 cm x 22 cm. Celupkan lady finger ke dalam kopi, susun rata didalam piring saji, tuang setengah adonan adonan marscarpone, kemudian susun lagi lady finger dan lapisi dengan sisa adonan marscarpone.
  7. Simpan di kulkas kurang lebih 3 jam
  8. Sebelum disajikan taburi coklat bubuk yg diayak.
  9. Jangan fikirkan diet pada saat menikmatinya :)

Wednesday, July 13, 2011

Black Forest


Setelah googling lama akhirnya saya menemukan resep ini di rekomendasi bbrp blogger . Cake ini saya bikin pas ulang tahun anak2 awal Juli kemarin. Cake yg bener2 moist dan komposisi gula yg pas dengan selera saya . Sayang saya ga sempet memoto kue setelah dipotong krn dah keburu lenyap:).
Saya copykan disini resepnya


BLACK FOREST CAKE
Makes 9-inch three-layered cake
source : Eliza

Cherries and syrup:
2 cups jarred sour cherries in light syrup, drained with 1 cup syrup reserved
1/2 cup (3 1/2 ounces) sugar
1/2 cup kirsch or other cherry flavored liqueur

Whipped cream frosting:
1/4 cup (1 3/4 ounces) sugar
1 tbsp cornstarch
3 cups heavy cream, chilled
1 1/2 tsp vanilla extract

1 recipe Devil’s Food Layer Cake, baked and cooled, but unfrosted, recipe below
Chocolate shaving (see note), for serving

FOR THE CHERRIES AND SYRUP: Reserve 8 of the prettiest cherries for garnish in a small bowl. Slice the remaining cherries in half and place in a medium bowl. Simmer the reserved cherry syrup and sugar together in a medium saucepan over medium heat until mixture is thickened and measure about 1/2 cup, 8 to 10 minutes. Off the heat, stir in the kirsch.

Toss 1 tbsp of the syrup with the cherries reserved for garnish. Toss 3 tbsp more syrup with the halved cherries. Poke the top of the cake layers thoroughly with a wooden skewer and brush with the remaining syrup.

FOR THE WHIPPED CREAM: Whisk the sugar and the cornstarch together in a small saucepan and slowly whisk in 1/2 cup of the cream. Bring the mixture to a simmer over medium heat, whisking constantly, until the mixture thickened,2-3 minutes. Let the mixture cool to room temperature, about 30 minutes.

In a large bowl, whip the remaining 2 1/2 cups cream and the vanilla together with an electric mixer on low speed until frothy, about 30 seconds. Increase the mixer speed to medium and continue to whip the mixture until it begins to thickened, about 30 seconds. Slowly add the cooled cornstarch mixture and continue to whip until the mixture forms soft peak, 1-3 minutes.

Line the edges of a cake platter with strip of parchment paper to keep the platter clean while you assemble the cake. Place one of the cake layers on the platter. Spread 1/2 cup of the whipped cream over the top, right to the edge of the cake, then cover with half of the sliced cherries. Repeat with another cake layer, 1/2 cup more whipped cream, and the remaining sliced cherries. Place the remaining cake layer on top and press lightly to adhere. Frost the cake with the remaining whipped cream.

Refrigerate the cake until it absorbs the soaking syrup, at least 2 hours or up to 24 hours. Before serving, let the cake sit at room temperature, 30-60 minutes, then gently press the chocolate shavings into the sides of the cake. Evenly space 8 small pile of chocolate shavings around the top of the cake and top each with a cherry. Remove the parchment strip from the platter before serving.

NOTE: Be sure to buy jarred or canned cherries packed in syrup, not water. You will need about 7 ounces of chocolate for the shavings to decorate the sides and top of the cake. Letting the cake to sit at least 2 hours before serving allows the soaking syrup to sink in and the flavors to meld; however in a pinch, you could serve it right away.

DEVIL’S FOOD LAYER CAKE

1/2 cup Dutch-processed cocoa powder, plus extra for dusting
1 1/2 cups all-purpose flour
1 tsp baking soda
1/2 tsp baking powder
1/4 tsp salt
1 1/4 cups boiling water
4 ounces unsweetened chocolate, chopped
1 tsp instant espresso or instant coffee
10 tbsp (11/4 sticks) unsalted butter, softened
1 1/2 cups packed light brown sugar
3 large eggs, room temperature
1/2 cup sour cream, room temperature
1 tsp vanilla extract

Adjust the oven racks to the upper-middle and lower-middle position and heat the oven to 350 degrees Fahrenheit. Grease 3 9-inch round cake pan, then dust with cocoa powder and line the bottoms with parchment paper. Whisk the flour, baking soda, baking powder, and salt together in a large bowl. In a medium bowl, whisk the boiling water, chocolate, 1/2 cup of the cocoa powder, and instant espresso together until smooth.

In a large bowl, beat the butter and sugar together with an electric mixer on medium speed until light and fluffy, 3-6 minutes. Beat in the eggs, one at a time, until combined, about 30 seconds. Beat in the sour cream and vanilla until incorporated.

Reduced the speed to low and beat in 1/3 of the flour mixture, followed by 1/2 of the chocolate mixture. Repeat with half of the remaining flour mixture and the remaining chocolate mixture. Beat in the remaining flour mixture until just incorporated.

Give the batter the final stir with a rubber spatula to make sure it is thoroughly combined. Scrape the batter into the prepared pans, smooth the tops, and gently tap the pans on the counter to settle the batter. Bake the cakes until a toothpick inserted in the center comes out with a few crumbs attached, 15-20 minutes, rotating and switching the pans halfway thorough baking
Let the cakes cool in the pans for 10 minutes. Runs a small knife around the edge of the cakes, then flip them out onto the wire racks. Peel off parchment paper, flip the cakes side up, let cool completely before frosting, about 2 hours.

Source: adapted from America’s Test Kitchen Family Baking Book


Sunday, May 08, 2011

Wajik


Lagi rapi rapi file file di laptop ketemu foto wajik yang dibuat setahun yang lalu. Secara saya memang penyuka makanan manis, maka wajik termasuk makanan yg tidak akan saya tolak jika disuguhi. Resepnya saya ambil dari Budi Boga.

Bahan:

700g beras ketan putih
200 g gula Jawa, sisir
75 g gula pasir
650 ml santan dari 11/2 butir kelapa parut
½ sdt garam
1 lembar daun pandan, potong-potong

Cara membuat:
• Cuci beras ketan, rendam air selama 2 jam. Tiriskan

• Kukus ketan selama 30 menit atau hingga beras ketan setengah matang. Angkat.

• Rebus gula pasir, gula jawa, santan, garam, dan daun pandan. Masak hingga mendidih.

• Tambahkan ketan ke dalam rebusan santan. Masak sambil di aduk-aduk hingga santan terserap habis. Angkat.

• Kukus kembali ketan selama 20 menit atau hingga ketan benar-benar matang. Angkat.

• Tuang adonan wajik ke dalam loyang yang sudah dioles minyak atau dialas dengan plastic/daun pisang. Tekan dan ratakan. Setelah dingin, potong-potong. Sajikan.

Thursday, September 23, 2010

Baklava


Baklava adalah salah makanan middle east, dengan rasa manis. Di cafe cafe sepanjang Sidney Rd, tak jauh dari rumah kami, banyak ditemukan makanan ini.
Bbrp waktu lalu (bulan puasa tepatnya) saya coba bikin sendiri. Gampang sekali, hanya butuh sedikit kesabaran untuk mengoles helaian phyllo pastry yg benar2 tipis itu.

resepnya saya ambil dari allrecipes.com.

Ingredients:

1 pound chopped mixed nuts (saya pake pistachio dan almond)
1 teaspoon ground cinnamon
1 package phyllo pastry
1 cup butter, melted
1 cup white sugar
1 cup water
1/2 cup honey
1 teaspoon grated lemon zest

Directions
  1. Preheat oven to 175 C . Butter a 9 x 13 inch baking dish
  2. Toss together cinnamon and nuts. Unroll phyllo and cut whole stack in half to fit the dish. Cover phyllo with a damp cloth while assembling the baklava, to keep from drying out.
  3. Place two sheets (saya pake 4 lembar) of phyllo in bottom of prepared . Brush generously with butter. sprilngkle 2 to 2 tablespoons of nut mixture on top. Repeat layers until all ingredients are used., ending with about 6 sheet of phyllo. using sharp knife, cut baklava (all the way trough to teh bottom of the dish).
  4. Bake in preheated oven 50 minutes, until golden and crisp
  5. While baklava is baking, combine sugar and water in small saucepan over medium heat and bring to boil. Stir in honey, vanilla and lemon zest, reduce heat and simmer 20 minutes.
  6. Remove the baklava from the oven and immediately spoon the syrup over it. Let cool completely before serving